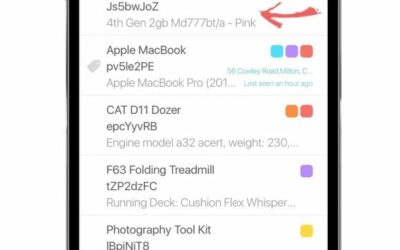
How can I make an Asset Register?

Did you know, you can use itemit to create an asset register?

There are many reasons why you might want to create an asset register.

If you own a business, you may want to create a fixed asset register to get more out of your assets and to make the most of their useful lifetime. This way, you can keep a tight audit trail and a closer grip on asset lifecycle management. Assets that are no longer useful can be replaced faster with this more transparent view of your business critical assets.

You might even wish to have one for personal and/or insurance reasons. This way you can simply export data, should the worst happen.

With itemit, the simple asset management app, it’s easy. Just copy the following steps:

1. Create an asset profile.

2. Make sure all of the relevant information has been added.

This may include maintenance and inspection information, receipts, dates of purchase, warranties.

3. Repeat Steps 1. and 2. for all of your assets.

4. Head to the Web Portal and login with your email and password.

5. Click on “Reports”.

6. There’s your asset register!

You can export your assets should you need to sent them to an insurance company.

You can also click on the assets themselves to see information and go to their profile.

How can I add financial information to assets?

Did you know you can use itemit to add financial information to all of your assets?

You can use this with our other tutorial on how to create an asset register. If your business uses a fixed asset register, you can use this tutorial to find out how to add financial information such as warranties and receipts.

With itemit, it’s a lot simpler than using a spreadsheet to keep track of your finances.

1. Open the app and click on the “add asset” symbol.

2. Add the asset.

Method One: Reminders

3. Click on “Reminders”.

4. Add information such as the end of a warranty. Press “Save”

Method Two: Information

5. Click on “Information”.

Click “text”.

6. Add the relevant info.

And/Or

7. click on “Date”

8. Add the relevant info.

And/Or

9. click on “currency”

10. Add the relevant info.

And/Or

11. click on “weblink”

Note You can add anything about the purchase under “information”, for example the telephone number of the vendor, etc.

12. Add the relevant info.

Method Three: Attachments

14. Click on the plus above “attachments”.

15. Here you can add pictures of receipts, warranties, anything.

How can I track asset maintenance and inspection schedules?

Did you know you can keep track of maintenance and inspection schedules using itemit?

With the simple asset management app, it’s easy, you just have to add in some information and sit back and the app will do the work for you.

You can use it for PAT tests or MOTs or even just for some routine maintenance.

How? Find out here:

1. Locate the asset you wish to add maintenance and/or inspection info to.

2. Open the asset profile.

Adding service reminders.

3. Click on the plus above “reminders”.

4. Add the relevant information: Name, date, time, and if it’s repeated. Then click “save”.

Adding handbooks, manuals, etc.

Option 1.

5. Click on the plus above “attachments” in the asset profile.

6. Add photographs of information from either your camera or gallery.

Option 2.

7. Click on the plus above “information” in the asset profile.

8. Choose the type.

9. Add the info. This can be weblinks to manuals, service history under “dates”, or simply text to add important comments about the asset. Click “save” when done.

Assigning the condition of an asset.

10. Go to the homepage and click on the menu.

11. Scroll down and click “New Label”.

12. Name it “damaged” and save.

Note: you can add as many labels as you want and so you can add “working”, “faulty”, “needs maintenance”. etc.

13. In the asset profile click on the plus above “labels”.

14. Click on the relevant label and save.

How do I export my data?

Note: You need to be an Enterprise user to Export your data.

Start your free 14-day trial of itemit Enterprise here.

Already got the app? Head to the menu and tap ‘Upgrade to Enterprise’

Next, log in to the itemit web portal here.

Option 1

1. To export all your asset data, click the Export Items icon in the top right corner.

2. Click the download button to export your data into an Excel file.

Option 2

1. Head to the Reports page in the left side menu.

2. Select the ‘Export All’ or ‘Export View’ option to export your data into an Excel file.

Note: ‘Export All’ exports all your asset data, whereas the ‘Export View’ option only exports the asset data currently shown by your selection/filter in your browser.

How do I add a user?

Note: You need to be an Enterprise user to add other users to your team.

Start your free 14-day trial of itemit Enterprise here.

Already got the app? Head to the menu and tap ‘Upgrade to Enterprise’

Next, log in to the itemit web portal here.

1. Click on the Users option in the left menu.

2. Click the + New User option in the left menu.

3. Fill in the email address of the user you would like to add in the email field.

4. Choose which Access Role the new user should have.

5. Click the Invite button to send an invitation email to the new user.

What’s next? Your new user will complete the setup of their account. Once complete, the user will become an Active user, rather than a Pending user.

How do I buy asset tags?

1. Visit the itemit Asset Tags page or click on the page on the itemit.com website.

2. Scroll down to the contact form.

3. Fill out your details & requirements in the form and submit.

We’ll be in touch shortly with options and prices!.

OR  Scan one of the following QR tags using the itemit app to tag an asset right now!